Enable Continuous Access share
Enable Continuous Access share
This section will create a Continuous Access (CA) share for High Availability (HA) Microsoft SQL Server for active database files.
Microsoft SQL Server can be deployed with an SMB file share as the storage option for active data files.
Amazon FSx is optimized to provide shared storage for SQL Server databases by supporting Continuously Available (CA) file shares, which are designed for applications such as SQL Server that require uninterrupted access to shared file data.
Note
It will take approximately 10 minutes to complete this section.
Important
Read through all steps below and watch the quick video before continuing.
-
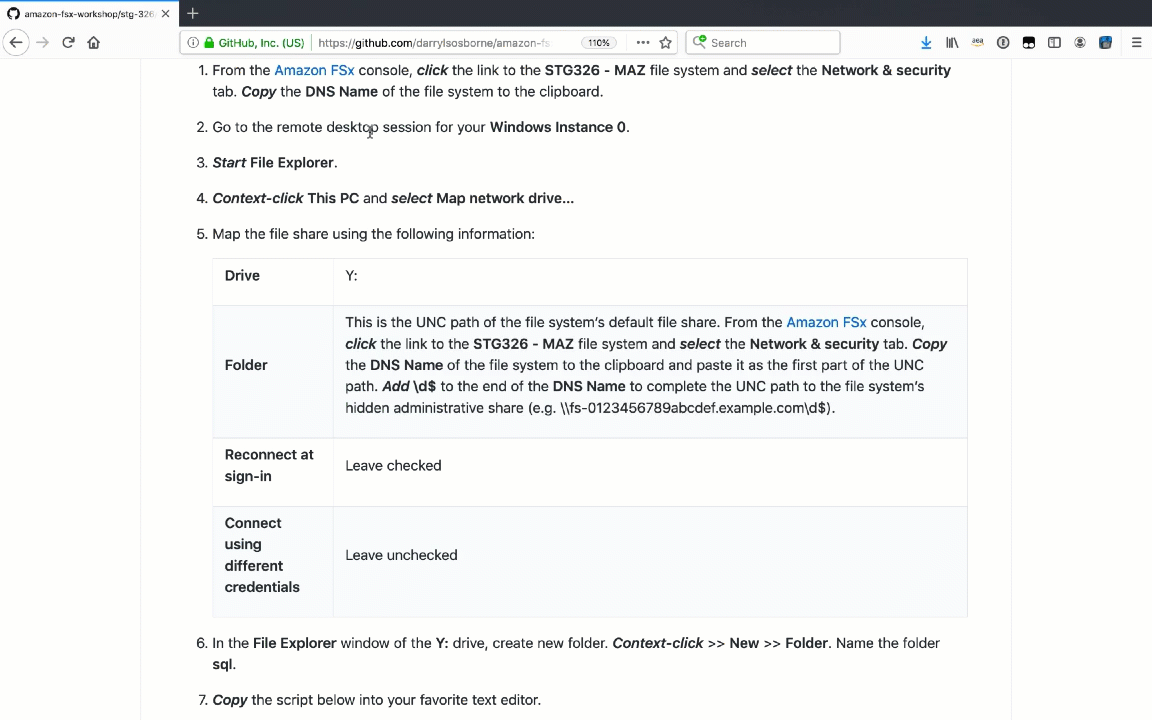
From the Amazon FSx console, click the link to the STG326 - MAZ file system and select the Network & security tab. Copy the DNS Name of the file system to the clipboard.
-
Go to the remote desktop session for your Windows Instance 0.
-
Start File Explorer.
-
Context-click This PC and select Map network drive…
-
Map the file share using the following information:
| Drive | Y: |
| Folder | This is the UNC path of the file system’s default file share. From the Amazon FSx console, click the link to the STG326 - MAZ file system and select the Network & security tab. Copy the DNS Name of the file system to the clipboard and paste it as the first part of the UNC path. Add \d$ to the end of the DNS Name to complete the UNC path to the file system’s hidden administrative share (e.g. \fs-0123456789abcdef.example.com\d$). |
| Reconnect at sign-in | Leave checked |
| Connect using different credentials | Leave unchecked |
-
In the File Explorer window of the Y: drive, create new folder. Context-click >> New >> Folder. Name the folder sql.
-
Copy the script below into your favorite text editor.
$WindowsRemotePowerShellEndpoint = "windows_remote_powershell_endpoint" # e.g. "fs-0123456789abcdef.example.com" enter-pssession -ComputerName ${WindowsRemotePowerShellEndpoint} -ConfigurationName FsxRemoteAdmin -
From the Amazon FSx console, click the link to the STG326 - MAZ file system and select the Network & security tab. Copy the Windows Remote PowerShell Endpoint of the file system to the clipboard (e.g. fs-0123456789abcdef.example.com).
-
Return to your favorite text editor and replace “windows_remote_powershell_endpoint” with the Windows Remote PowerShell Endpoint of STG326 - MAZ. Copy the updated script.
-
Go to the remote desktop session for your Windows Instance 0.
-
Click Start >> Windows PowerShell.
-
Run the updated script in the Windows PowerShell window.
NOTE: Complete the next few steps using the remote PowerShell session to the FSx file server.
- Run the script in the Remote Windows PowerShell Session.
New-FSxSmbShare -Name "SQL CA Share" -Path "D:\sql" -Description "SQL CA share" -ContinuouslyAvailable $True -FolderEnumerationMode AccessBased -EncryptData $true
-
Open the AWS Secrets Manager console.
Tip
Context-click (right-click) the link above and open the link in a new tab or window to make it easy to navigate between this lab tutorial and AWS console.
-
Select the Secret name link for Password-<GUID>.
-
Scroll to the Secret value section and click the Retrieve secret value button.
-
Use the Secret key/value pairs of username and password as the credentials to authenticate the Windows PowerShell Credentials Request window.
Windows Server Failover Cluster deployments commonly deploy an SMB file share witness to maintain quorum of the cluster’s resources. Witness file shares require only a small amount of storage for quorum information. Amazon FSx file systems can be used as an SMB file share witness for Windows Server Failover Cluster deployments.